13 Unconventional Ways You Should Be Using A Muffin Tin
Those who haven't been cooking for a long time may not know this, but the common muffin tin is pretty much one of the most versatile tools that home gourmands have in their kitchens. Sure, they can whip up some mean banana nut muffins that look better than those at Starbucks or bake a whole batch of birthday cupcakes in the space of an hour when really pressed for time. But the muffin tin is so much more than a pan to bake muffins and cupcakes in.
Give a craftsy mind a muffin tin and a bit of thinking time, and you'll end up with everything from cups of seedlings to individualized portions of dinner in no time at all. Those who know how to use this wonder of a baking tool to their best advantage look at the basic properties of the muffin tin, from its evenly-spaced cups to the exact measurement of each cup. They also consider things like how well it fits not only in the oven but also in the fridge, freezer, or even garden. If you're now sufficiently intrigued about how you might be missing out on the uses of this amazing kitchen tool, we invite you to read about 13 unconventional ways to use a muffin tin. The knowledge you gain could change not only how you approach baking muffins and cupcakes but how you think about the rest of your kitchen tools as well.
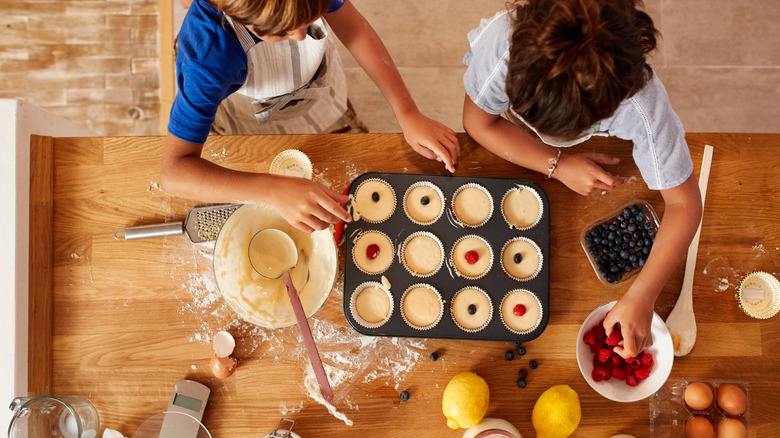
1. Omelet cups
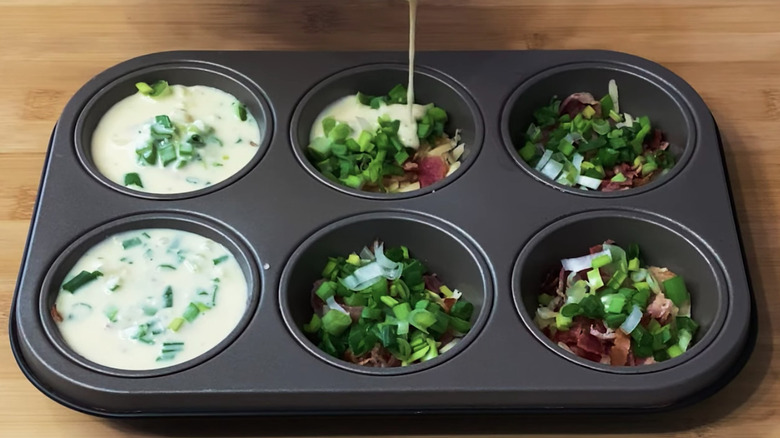
Miniature omelets work their way into a number of special occasion meals, like Mother's Day brunch. However, they also make for a quick breakfast that you can throw into a plastic container to heat up in the microwave at work, provided that you have a batch of them cooked up and ready to go.
Here's where muffin tins can be an egg cook's bestie. The cups in muffin tins are the perfect size to create miniature omelets. To do this, preheat the oven to 350 F. Then, spray a bit of cooking spray into the muffin tin. Make up a batch of your favorite omelet recipe. Stir in ingredients like bits of ham, sautéed onions and peppers, grated cheese, sausage bites, spices, and of course, eggs and milk (if you use milk in your omelets).
Bake for 20 minutes. Take them from the oven and allow to cool. Remove them from the cups and store them in a plastic container or zip bag. They'll be ready to go when you need them.
2. Kids' snack and drink tray
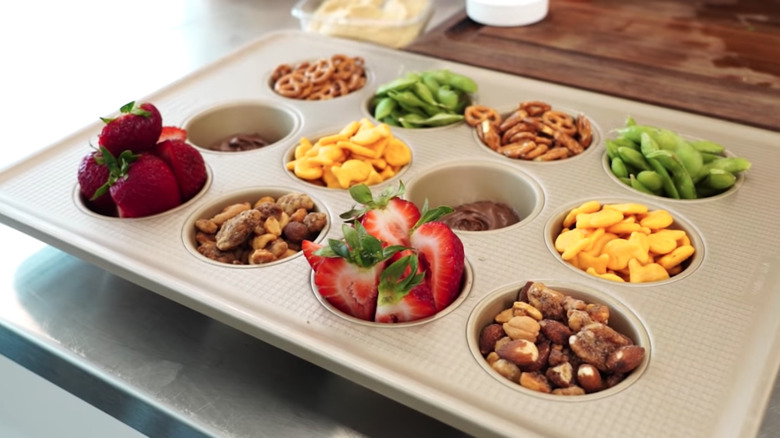
Kids love commercial snack trays, like Lunchables, because of their individualized portions of meat, cheese, fruit, drink, and cookies. If you have a muffin tin at home and a variety of snacks, you have the makings of a homemade snack and drink tray for your kids. The advantage of this is that you control what types of snacks go into the tray. For example, if the occasion is movie night, you can put snacks like popcorn or popcorn balls, miniature candy bars, and licorice bites.
For a kids' picnic out in your backyard, cut up apples, cucumbers, cheese cubes, deli meats, and other finger foods. Add in crackers or chips that your kids like. (Mild salsa or dip and chips work well.) Be sure, also, to leave some slots for drinks. Fill up your kids' sippy cups with juice and other beverages and put the lids on. Slide the drinks into a few of the empty muffin tin cups to create a food and drink carry-all that will help you transport all the goodies for the yard picnic in one trip.
This trick works for grown-up parties, too. Use muffin tins to serve snacks like olives, miniature pickles, cheese cubs, cuts of meat, and more.
3. Portion meal prep measurements
Muffin tins come in a variety of sizes, from the smallest, which a baker might use to make tiny mini muffins, to the largest, which are used to create the jumbo muffins you can buy in a package of a dozen at Costco. As such, each muffin tin cup will hold a different amount, with the smallest cups having a 1.5-ounce capacity and the larger muffin tin cup having up 8 fluid ounces.
We're mentioning the measuring capacity of muffin tins because if you're trying to portion ingredients for meal preps for meals like mac and cheese or bean soup for one person, you can save yourself a lot of time and headache by using the muffin tin cups to measure out each meal. For example, if you're prepping six or eight mac and cheese dinners, ladle your cooked mac and cheese into each muffin pan cup to freeze. Once the muffin pan is full, place it in the freezer.
If you use a silicon muffin pan to do this, you'll have an easier time later on when you're ready to pop each portion of macaroni and cheese out of the muffin pan. Once you remove the portioned meal from the muffin pan, transfer it to a plastic container or a Ziploc bag for quick, microwaveable meals that you just pull out of the freezer and microwave.
4. Make mini-tart shells

Mini tarts, with their sliced fruit, cream cheese fillings, and flaky crusts, add brightness to dessert tables. Because they're so pretty, you might think that making them from scratch constitutes a complicated affair.
It doesn't have to be if you use our little muffin tin trick to help the process along. The shape and size of the muffin tin cups make molds that will help you shape the crusts of the tarts. The process starts with your favorite pie dough recipe. Make it from scratch or use store-bought.
Roll out the crust, and using a fluted cookie cutter, cut out enough "pie cookies" to fill the cups of the tin. Push the crusts into each cup. Once this is complete, refrigerate. You can ensure that the bottom insides of the tarts remain flat by pressing wax paper into the centers and weighing the paper down with rice or dry beans. Bake as you normally would.
Then, fill them with the ooey-gooey pretty stuff. We mentioned ingredients like cream cheese and fruit, and while these are common, you're not limited to that. Chocolate, white chocolate, pumpkin pie filling, and even savory fillings, like eggs, work if you're going for a mini quiche.
5. Create apple dumplings
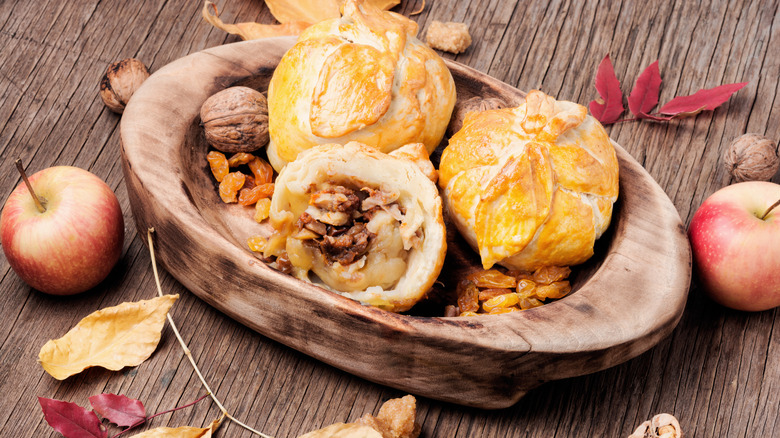
The apple dumpling — that ubiquitous fall recipe that brings together a cored apple, dried fruit, sweet spices, butter, and flaky crust — has been around since the 1600s or 1700s. First made popular in England and the cooler parts of Europe, this dessert has become a staple sweet treat during the fall in the Northeastern United States.
One notable feature of this dessert is the round shape, which is initially created by the shape of the pie crust formed over the cored apple. While some apple dumpling recipes ask you to wrap a flaky crust around the apple, like a fried wanton wrapper, others ask for a biscuit crust.
For this second type of dumpling, the muffin tin helps a great deal. In this case, you can press the bottom of the dumpling into the tin, add the apple and other stuffing, and then top the dumpling with more biscuit crust. It's also worth noting that the recipes for the crusts may differ. In the former case, it's common to use pie crust to form the shell around the dumpling. In the latter case, biscuit dough can be used, making the resulting dumpling a bit plumper.
6. Make Chinese steam buns

Because of their similarity to dumplings, some might confuse Chinese steam buns with their less-fluffy dumpling cousins. However, one key ingredient, yeast, sets Chinese steam buns apart from dumplings. They're usually round, filled with various goodies of choice — pork is a common stuffing — and steamed in a steam basket until they're done.
But what should you do if you have no steamer but still want to make that tasty steamed bao recipe you found online? A muffin tin rescues your steamed bao dreams. Here's how to do it. Line a muffin tin with paper in each cup. Place the individual rolled steamed bao buns into each cup. Fill a roasting pan with water and gently place the muffin tin in the roasting pan. Cover the pan and allow the buns to steam for 15 to 20 minutes in a oven. Once they're steamed, let it sit for a few minutes before removing it from their pan.
One thing to keep in mind is that water's boiling point is 212 degrees Fahrenheit. You may need to experiment a bit with your roaster ahead of time to see how much time it takes for water to boil in the roaster in the oven before you try this steaming method.
7. Organize the kitchen catch-all drawer
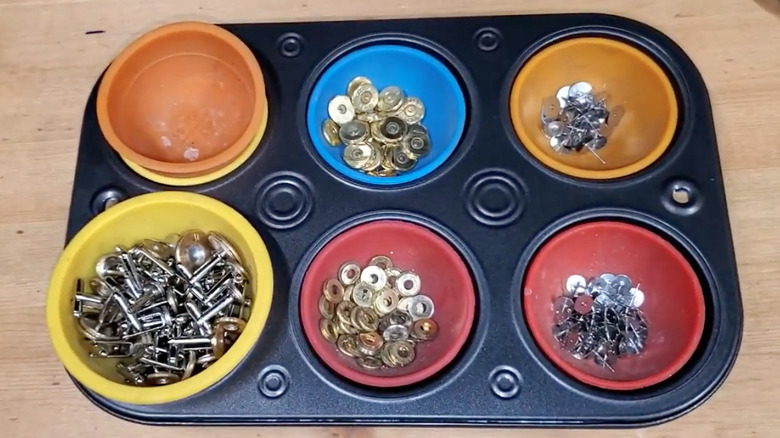
It may be no exaggeration to say that most home kitchens have a catch-all drawer, or as it is more commonly called, a junk drawer. It's the drawer where you'll find random hammers, twist ties from bread, paperclips, tacks, pencils and pens, condiment packets from your last visit to McDonald's, sticky note pads, and small gadgets that look important but you can't quite remember what they do. The hassle of digging through the drawer when an item needs to be located can make even the most clutter-friendly person slightly mad. Thus, finding a way to organize this chaos has its advantages. If you use the kitchen for homework or for writing up your budget, organizing this drawer to make it multi-activity friendly can do wonders.
Muffin tins, with their little individual compartments, make the task of organizing your junk drawer easier. Small items like paper clips, thumbtacks, twist ties, condiment packets, and rubber bands fit nicely into the individual cups. And while you might need additional non-round dividers for your hammer and sticky notes, getting the small things out of the way is half the battle. Finally, you can stack plastic or silicon cups vertically in the muffin tin to add storage compartments in the muffin tin. In this way, you build upwards, not outwards, allowing you to use the space more efficiently for small items without getting a second tin.
8. Hack your garden
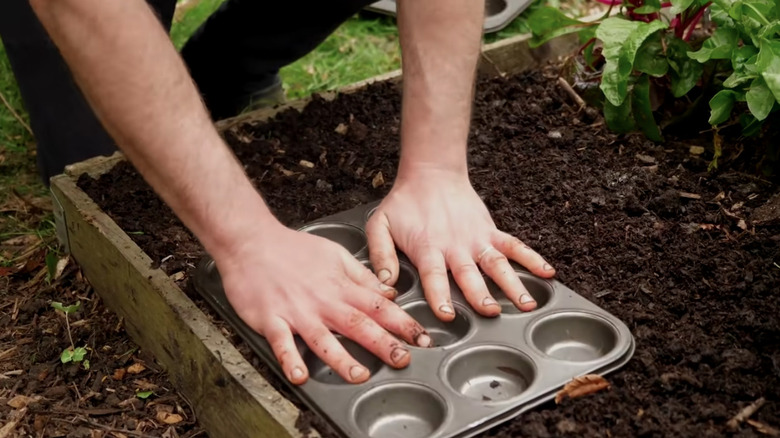
If you plant vegetable gardens, using a muffin tin in your garden can be a major hack. There are at least two uses for a muffin tin in your vegetable garden: to separate and carry your seeds and to create properly spaced planting holes for your seeds. This task will be more efficient if you use a couple of muffin tins.
First, if you plot out your garden and have a specific plan for each section and each plant placement, use the muffin tin to organize your seeds according to the plan. For example, one muffin cup might hold lettuce seeds and represent one corner of the garden. Another spot might hold radish seeds. Another still might be used for bean seeds. Et cetera. Use this for any seed you plan to plant. If you know what each seed produces for each plant, save yourself some time by pouring the seeds for each plant into an individual muffin cup. Otherwise, keep them in the seed packs, but put them in the tin to remind you of their placements in your garden.
Second, a muffin tin pressed into the soft earth makes it easy to space out your plants. The spaces for plants requiring more room between seedlings can be measured using a larger muffin tin. Just press the tin into the ground to form the indentation for the holes. Muffin tins with more cups work well for seeds requiring less space between plants.
9. Put together a cookie gift around the holidays
Foodies worth their salt know that the best gifts come from the kitchen. And around the holidays, especially, gifts of food and drink tend to be creative, colorful, and beautifully packaged. Among our favorites are the cookie tins filled with an assortment of cookies, ranging from butter cookies to chocolate chip cookies. If you love those, too, you'll find many different types in the store come the holidays.
But you don't have to buy tins of cookies to give pretty cookie gifts. Instead, you can make your own using a muffin tin, fancy cellophane, ribbons, and, of course, a variety of cookies. Create this treat by sorting the cookies into stacks of similar cookies.
For example, if you have chocolate chip, butter, and raisin cookies, create three different stacks of cookies. Place them into the cups. (If the cookies are large, you may want to go with a 6-cup muffin tin, which is usually larger.) Once the cups are filled, wrap the tin in holiday cellophane and ribbon to give to the gift recipient.
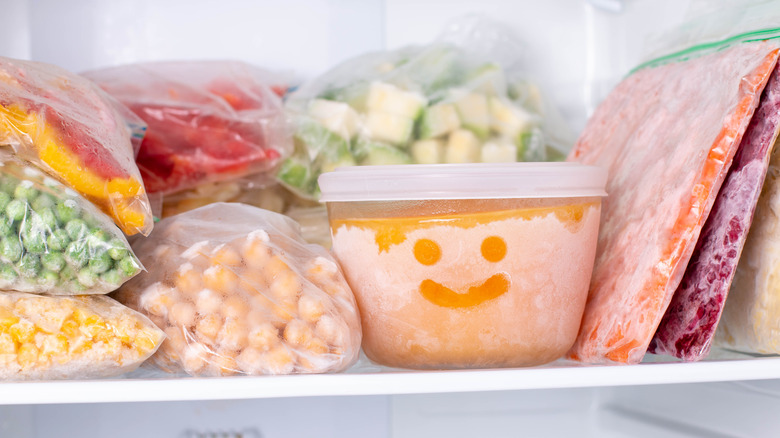
10. Freeze soup stock
If you make soup stock ahead of time to freeze for meals you'll eat down the road; this handy hack makes it easier to get the proportions right. Once your soup stock is done and cooled down a bit, pour it into the cups of a muffin tin and pop the tin into the freezer until each cup is frozen solid. Once it's frozen, transfer the individual soup stocks into Ziploc baggies. Each cup's portion will be just the right amount for your next batch of soup.
To make removing each one of them from the muffin pan a bit easier, you can experiment with a silicon muffin pan. They are soft and pliable, a bit like an ice tray made of cloth. In light of that, you'll need a little bit of support for the bottom of the muffin pan to get it into the freezer without a spill. Placing the silicone muffin pan on a baking sheet before you put it into the freezer will keep the muffin pan stable until the soup stock freezes. Once it is frozen, the pliable nature of the silicon muffin pan makes it easy to remove the frozen soup. Just push the bottom of each cup and pop the soup stock out like you're popping an ice cube out of a tray.
11. Create large ice cubes for the punchbowl
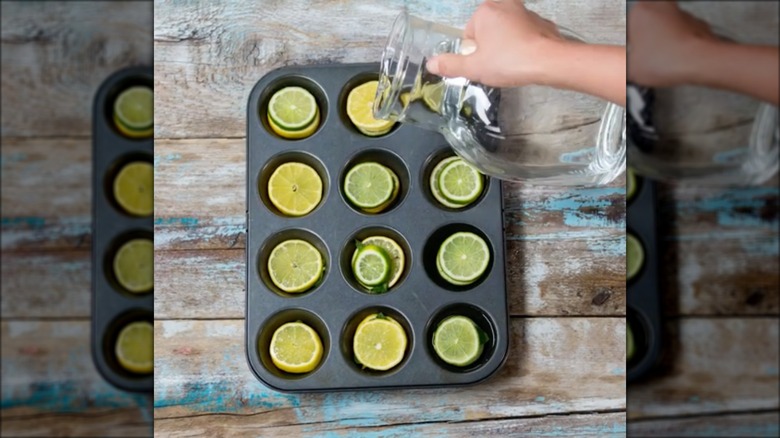
Big parties call for big bowls of fruity punch. Savvy party planners go as far as putting an ice sculpture in the punchbowl. But if you're a home party planner on a budget, you don't need a mermaid sculpture sitting in your punchbowl to chill your punch. A muffin pan and a bit of water will do the trick nicely. Or you can do a muffin pan, water, and some sliced fruit if you really want to make things fancy schmancy. If you go this route, choose fruit in accordance with the type of punch you're making. For example, a strawberry punch and strawberry-filled ice cubes would match the flavor.
Once the cubes are frozen, run some warm water over the back of the muffin tin to allow the cubes to slide out more easily. Or, use a silicon muffin pan, which is flexible, to make your large ice cubes. The flexible nature of the pan makes it easier to bend and twist until the ice cubes pop out.
One more thing of note: You don't need to save this trick just for filling a party punchbowl. Large ice cubes in a pitcher of water also make a refreshing treat, particularly if you add fruit to those cubes because it'll infuse the cubes and the water with hints of that fruit's flavor.
12. Cook single servings of meatloaf
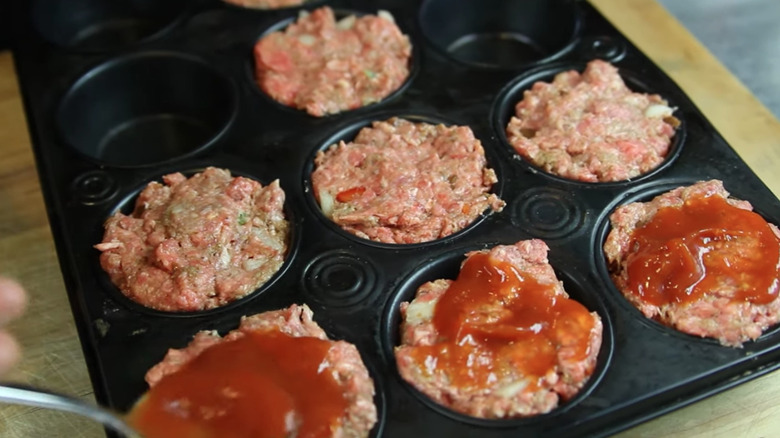
For many of us, meatloaf and dishes like mashed potatoes count among the meals that bring on waves of nostalgia from our childhoods. There's just something so comforting about sitting down to a serving of meatloaf and potatoes to warm the tummy and the heart. It reminds us of dinners at home with our families growing up.
And if our experiences eating meatloaf growing up were typical, we ate meatloaf that was made in a loaf pan. Each serving had to be sliced from the larger loaf. However, there are a number of advantages to throwing off this part of your personal foodie tradition and opting to cook meatloaf in a muffin tin instead of in a loaf pan.
First, making meatloaf in a muffin tin allows you to cook up individual portions of meatloaf ahead of time. If you live alone or if you work late and want to leave something quick and easy for your family to microwave, having some individual servings of meatloaf frozen in the freezer makes putting dinner together a fairly simple affair.
And second, muffin tin-sized meatloaf servings also make for cute food items to serve at a get-together. Bake the meatloaf in the muffin tin, and then serve it, along with mashed potatoes and other sides, as well as garnishes. Dinner is more evenly portioned that way and easier to serve. It's also just nicer looking this way.
13. Plant succulents or seedlings in it
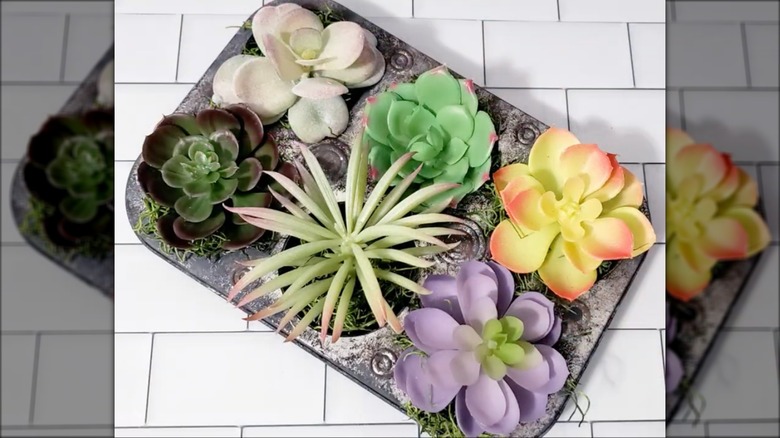
Muffin tins are logical places to start succulent or herb gardens. Aside from the uniformity of the size and space of each cup, the tray-like aspect of the muffin tin makes it easier to transport the plants from the starter container to the garden. While many people allow some plants to remain in the tin indefinitely — as is the case with miniature succulent gardens — other home gardeners will want to transplant the seedlings they grow in the muffin tin.
If the latter turns out to be true for you, then you'll want to take some extra steps to ensure that the plants survive the transplant into your vegetable or herb garden. To make the process easier, line the muffin tin with all-natural paper muffin cup liners. Because the paper muffin liners are biodegradable, you can put the baby plants, cup, and all directly into the ground when you're transplanting.