16 Grilling Hacks You'll Want To Know For Your Next Barbecue
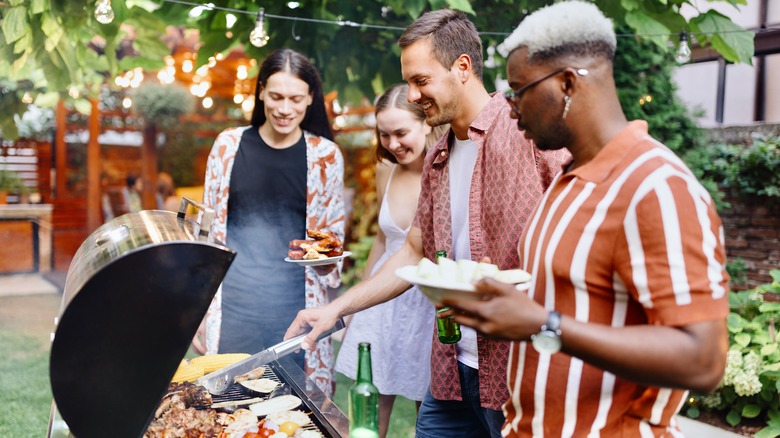
Do you want to earn the title of grill master? If you're looking to impress your guests with your knowledge, skills, and, of course, incredibly delicious food, the next time you host a backyard barbecue then you'll want to read up on these best grilling hacks that will help you achieve impressive results. For example, you'll learn how a few ice cubes can help you craft a perfectly moist and juicy burger. You'll also pick up a quick tip that will help make sure you don't ever serve dry and overcooked sausages again.
In the next few sections, you'll learn more about these tips and tricks, along with several others, that will prepare you to impress your guests and earn the title of King or Queen of the Grill. Most of these ideas will take just minutes of your time, but they'll also make you look like a true professional.
1. Clean the grill using an onion
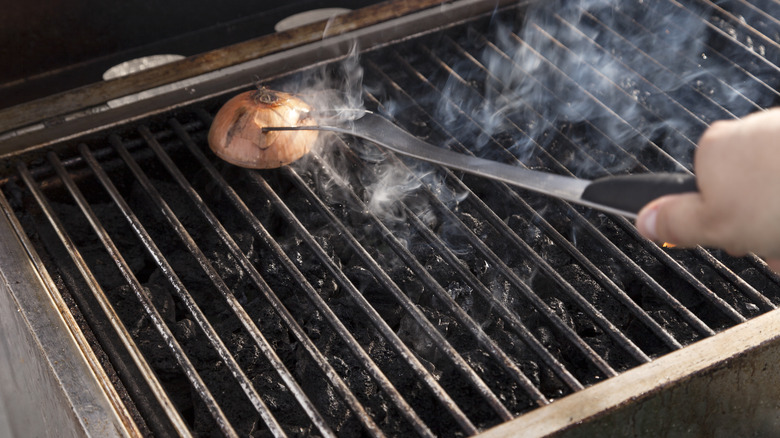
Cooking food on the grill can be satisfying, especially as you're thinking about how good it is going to taste when you get to bite into it. However, there is one aspect of grilling that is not as exciting and can be a bit of a pain: cleaning the grill. But, scrubbing charred and crispy bits of meats and veggies off your grill can be difficult, time-consuming, and sometimes requires you to pull out chemical cleaners that you'd probably prefer to keep away from your cooking surfaces.
Enter the beauty of this first hack: Use an onion to clean your grill. Onions are non-toxic, inexpensive to have on hand, and impressively effective at getting burnt-on messes off of dirty grill grates. The reason onions work so well is because of how acidic they are. They're also moist, so when you rub them across hot grill grates, the acidic liquid drips out and loosens the charred-on clumps. To try this hack, get your grill nice and hot. While it is heating up, cut the onion in half and poke a grilling fork through the rounded end (so that the flat side of the vegetable is down). Rub the flat side back and forth across the grates until the charred pieces have dropped off. If you need some extra help, spray a little white vinegar over particularly crusty messes to release more gunk.
2. Use hot water to check propane tank levels
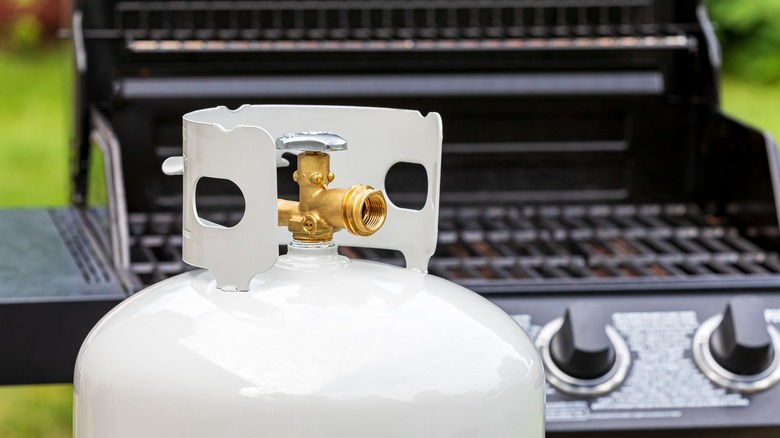
Running out of propane when grilling is like running out of gas when you're in the middle of driving down the highway. Propane is the fuel source for many types of grills, and without it, they simply won't work. Clearly, it is essential to make sure that your propane tanks have enough fuel before you fire up the grill to start cooking food. However, if you don't have a propane gauge, doing so hasn't always been easy — until now.
Some hot water can actually help you assess how full your tanks are. All you'll need to do is fill up a glass or bowl with hot water from the tap (it shouldn't be boiling). Then, pour the water over one side of the tank. Feel the tank with your hand, starting at the top and working your way down to the base. Anywhere that feels ho t to the touch does not have propane, while areas that feel cool are still filled with propane. This means that if you make it nearly all the way to the base of the canister before you notice the shift from hot to cold, your tank is almost empty and should be refilled or replaced before you start grilling.
3. Soak bamboo skewers in water
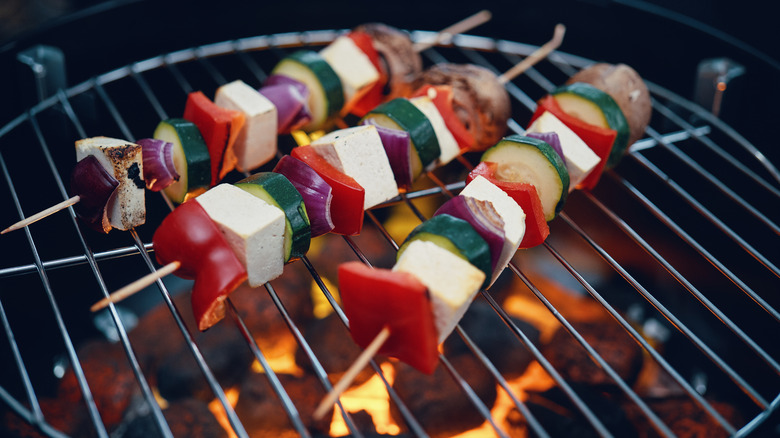
If you're like many, you probably have a love-hate relationship with bamboo skewers. On the one hand, they are inexpensive, easy to use, and make it easy to grill tasty kabobs and other items. On the other hand, they're flammable and often get caught up in the flames and burnt/broken.
Fortunately, there is a simple solution that will still let you use the bamboo skewers that you love. Before you stack them with your meat and/or vegetables for your kabobs, soak the skewers in water. When they're nice and saturated (after soaking for at least 30 minutes), the skewers will be too wet to get burnt by the flames. The skewers are very light and will float in water, so you'll want to have a plate, meat tenderizer, or another heavier item available to push them below the surface of the water. After you've soaked the skewers, you can load them with whatever it is you wish to grill. To further mitigate the likelihood of burnt skewer ends, fill the skewer completely. Without any empty sections, the flames won't have anywhere to ignite.
4. Keep your burgers moist with a few ice cubes
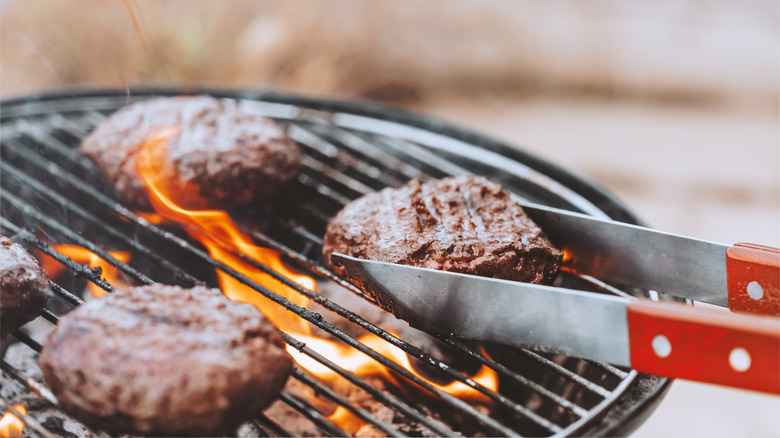
A moist and juicy burger is what every grill master aims to serve their guests. However, what we wish and what actually happens don't always seem to match. If your burgers keep turning out too dry, then this next hack is for you. And, fortunately, what you'll need is probably in your freezer right now. That's right, an ice cube can help you craft juicy burgers every time.
All you need to do is place an ice cube on inside each or of your burgers. Seal up the opening with ground beef before putting it on the grill. As the burger cooks on the grill, the ice will melt inside the meat, keeping it from getting overly dry. And, don't worry, you won't be watering down the taste of the burger or anything. Ice cubes are small and won't do much of anything to the flavor of each of your patties. However, keep in mind that this hack will work better when you're grilling thicker patties that will have space to hold the ice cube.
5. Let bread help you identify hot spots
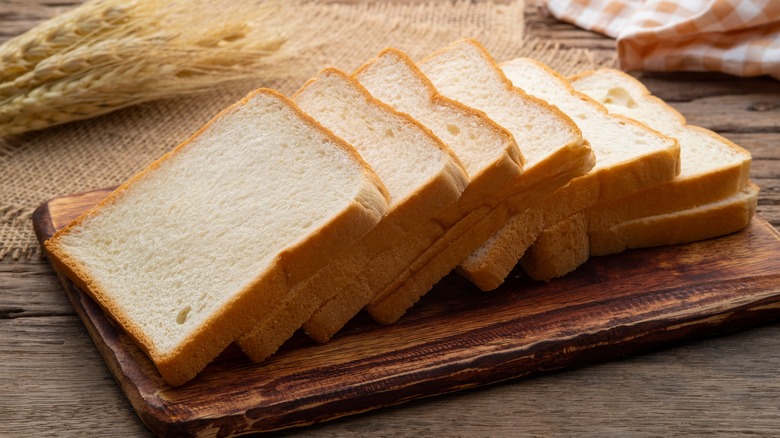
Hot spots can make it difficult to ensure that the foods you're grilling cook evenly. If one spot of the grill is hotter than the others, then you're going to end up with some items that are overcooked or too charred compared to the rest of the batch. However, while you probably can't avoid these hot spots, you can learn how to use them to your advantage.
Before your next barbecue, pick up an extra loaf of bread at the grocery store. After you've heated the grill, lay the slices of bread out across the grates. Leave it for 1 minute before flipping each slice over. Take a look at the appearance of the side that was against the flame. If there are pieces with darker marks, they were located over a hotter section of the grill. Slices that have fainter marks were over a cooler section.
Once you know where the hot spots are, use them to designate different heating zones. Starting meats over a hotter section of the grill can give them a nice charred outside, but then you can move them to a cooler section so that they don't end up cooking too quickly and drying out on the inside.
6. Spiral cut your hot dogs
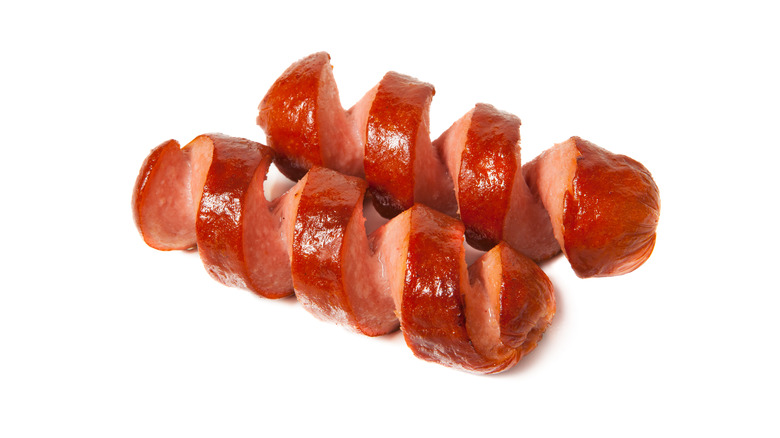
If you've seen spiral-cut hot dogs before, the grill master didn't just cut them in that way to make them look different. Cutting hot dogs in this manner is actually a technique that can help ensure they cook properly on the grill — leaving the outside perfectly charred and utterly delicious. This hack works because a spiral-cut hot dog has more surface area than one that is straight out of the package. With an increased surface area, more of the frank will get exposed to the direct flames of the grill, leaving your guests with more of the delicious charred taste in each bite. The hot dogs will also cook faster because they are cut open, letting the heat inside at a faster rate.
The best way to spiral-cut a hot dog is when it is skewered. Once the skewer is poked through the center of the dog, you can use it to rotate the hot dog as you press the sharp edge of a knife against it. This will score the edges and open up the inside with a beautiful spiral cut going from the top to the bottom of the frank.
7. Poach sausages before grilling them

A perfectly-grilled sausage has a charred outside with a center that is juicy and delicious. However, achieving such results is not always easy. By the time the outside of the sausage is beautifully charred, the inside is often overcooked and overly dry from all of the juices running out as the casing contracts. There is a simple solution that can help you avoid this common problem: Try poaching your sausages before throwing them on the grill.
After poaching the meat, it will only need a few minutes on the grill to let the outside get charred. You won't have to worry about the inside turning out too dry. When poaching, use a meat thermometer to help you identify when the sausage is ready to come out of the pot of hot water on the stovetop. When the internal temperature reads 150 degrees Fahrenheit, remove it from the pan and put it on the grill. Now, when you toss it on the grill, the casing won't have enough time to contract around the inside, so all of those moist and delicious juices will remain in there until you or your guests take a bite.
8. Keep a spray bottle of apple juice next to your grill
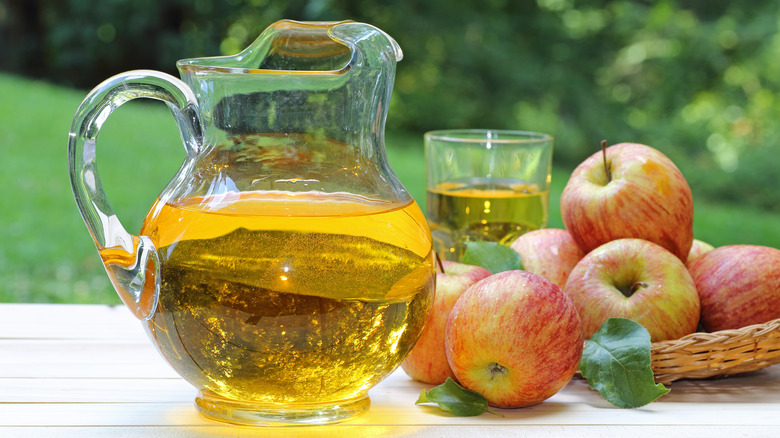
One of the secrets to juicy grilled meat is to make sure that it doesn't dry out as it cooks. Believe it or not, apple juice can actually come in very handy when you're trying to achieve this goal. Add some apple juice to a spray bottle and use it to spritz sausages, burgers, chicken, and other meats as they cook. The process of spritzing helps keep the outside of the meat from getting so hot that it dries out too much. When you spritz with apple juice some of the sugars will caramelize, sealing moisture inside the meat. It will also help the outside from being overcooked while the inside is still raw.
Apple juice is just one of the many things you can spritz your meats with. You could also try water, barbecue sauce, or whatever marinade you used. But, the malic acid in apple juice makes it a great choice because it helps to intensify the flavor of what you're grilling.
9. Use ketchup to label the buns

When you're hosting a backyard barbecue, you want to keep all of your guests happy. One of the best ways to do this is to make sure that you cook their burgers the way they like them. Someone who enjoys medium-rare burgers is going to be upset if the patty on their bun is well done. The opposite is definitely true for those who like a more well-done burger. They aren't going to want a burger with a pink center. However, keeping track of all of these orders and trying to remember when you should remove each burger from the grill is not so easy.
That is, until you learn this next hack. Once you take orders from your guests, label their bun using some ketchup to let you know how they want their burger cooked. Just squeeze out an "R" for rare, an "M" for medium, or a "W" for well done, and you can pull the burgers off the grill at the appropriate time and place them on the right bun to give your guests. It's that simple!
10. Light the coals using an egg carton
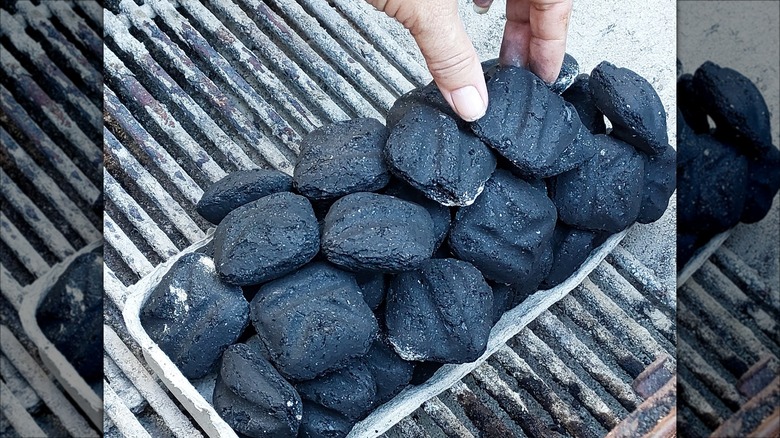
Do you prefer cooking on a charcoal grill? These grills definitely do deliver a distinct, smoked flavor to the foods you cook. However, one of the downsides of using them is that they can be more difficult to get going than gas or propane grills. Fortunately, there is something that is probably in your fridge right now that can help you get your grill started: egg cartons.
This egg carton hack is so easy to use, too. Start by placing the charcoal briquette in each section of a cardboard egg carton (making sure the ends of the carton are cut open to let air in). Then, lower the carton into the base of the grill, add in a few more coals, and make sure the dampers are open. Use a lighter to light each corner of the egg carton. In no time, the burning cardboard should get the charcoal lit up and smoking so you can soon start grilling your food.
11. DIY a warming and toasting rack
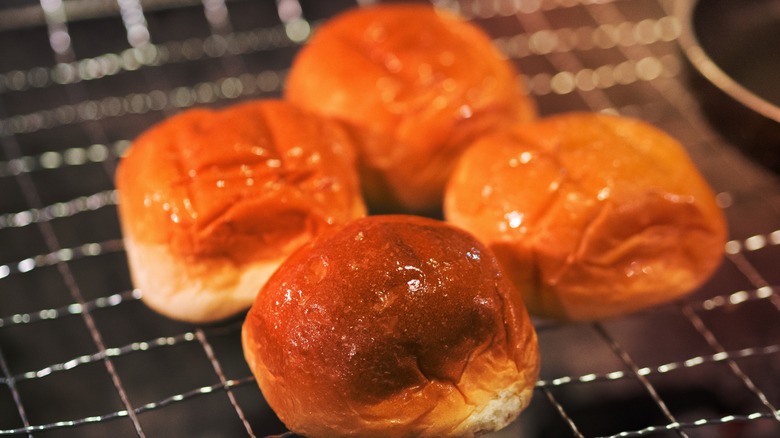
A burger or hot dog served on a cold bun is, well, sad. However, if you place the buns directly on the grill, they may end up too charred or toasted for your liking (or that of your guests). They're really best when they are lightly toasted. Fortunately, this next hack can help you make this a reality — and it won't cost you anything extra.
You can DIY a toasting rack for buns using four cans and a cooling rack. Place the cans on one side of the grill in the shape of a rectangle. They'll form the support columns for the cooling rack, which when placed on top of the cans will be far enough away from the flames to prevent your buns from getting charred, but close enough to let them toast up nicely from the heat below them. Just move your burgers or hot dogs to one side and set up the toasting rack for the last few minutes that your food will be on the grill.
12. Stop food from spinning with two skewers
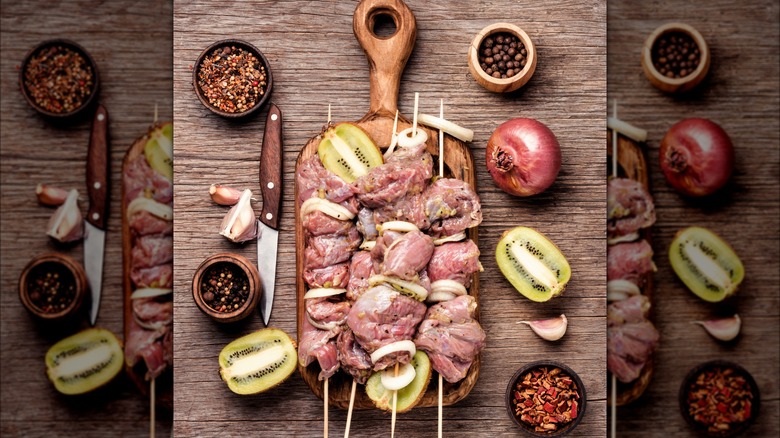
Have you ever tried grilling kabobs or skewers of shrimp or vegetables? While grilling all of these foods can give them a deliciously smoky flavor, using skewers can add some complications to the mix. If you've ever had the meat or veggies on the skewers roll around when you try to flip them, then you know precisely what you're talking about. If they roll, then only one side of the kabob is going to be exposed to the direct heat of the grill. This could leave it overly charred on one side, with the other side missing out on the gorgeous grill marks and the corresponding taste and texture they deliver.
Next time, instead of using just a single skewer to hold your kabobs and other items, try using two. With two skewers, the food you're grilling will be more stable, and won't be able to rotate around the skewers when you don't want them to. Another option that can save you from spinning food is to purchase flat skewers.
13. Build kabobs directly on rosemary sprigs
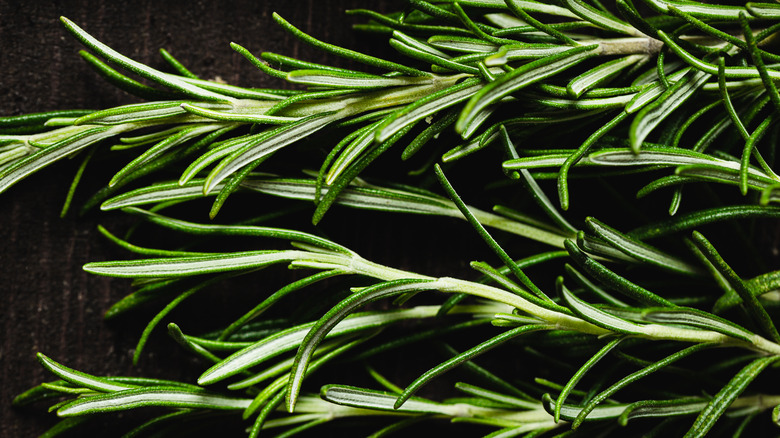
If you're out of skewers and want to make kabobs, don't fret. There is something else that you might have in your kitchen that can stand in as an excellent substitute: fresh rosemary sprigs. Not only is the stick-like structure of each sprig ideal for skewering meat and veggies, but the sprigs will also infuse the foods you're grilling with delicious rosemary. When picking sprigs to use for this task, look for ones that are on the thicker side, since they'll hold up better when skewered through your kabobs or when flipped on the grill.
You can make rosemary sprig kabobs with whatever ingredients you like. Keep in mind that rosemary pairs beautifully with lamb and pork, but it will also taste good with chicken, fish, or beef. After you've assembled your kabobs, all you'll want to do is baste them with a little olive oil and a little more fresh rosemary to really taste the flavor in the finished kabobs. Then, grill for about 5 minutes on each side before enjoying.
14. Grill fish over sliced citrus fruits
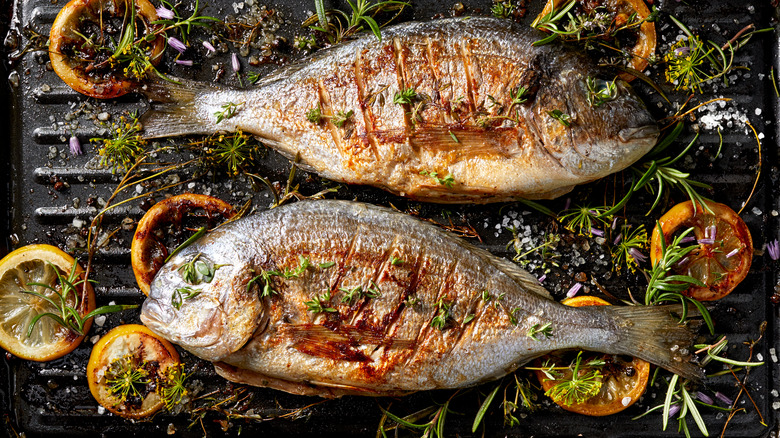
Grilled fish is flavorful and delicious. However, fish is also difficult to grill. It is much flakier and more fragile than chicken, burgers, steaks, and even most vegetables. The fish can stick to the grates, leaving you with a huge mess to clean up and an entree that looks less than appetizing. Or, even worse, pieces of the fish can flake off and fall between the grates.
The next time you want to grill fish, try placing it on top of a few lemon, lime, or orange slices. The slices of these citrus fruits will serve as a barrier between the fish and the grates of the grill, making it less likely for the fish to stick to the grates. They'll also stop pieces from flaking off and getting lost in the coals of flames.
In addition, citrus flavors pair beautifully with fish, so your finished meal is likely to have an even better taste than if you cooked it straight on the grates. Plus, you can serve the fillets directly over the grilled citrus slices, adding some gorgeous color to your dinner plates.
15. Don't salt burgers too soon
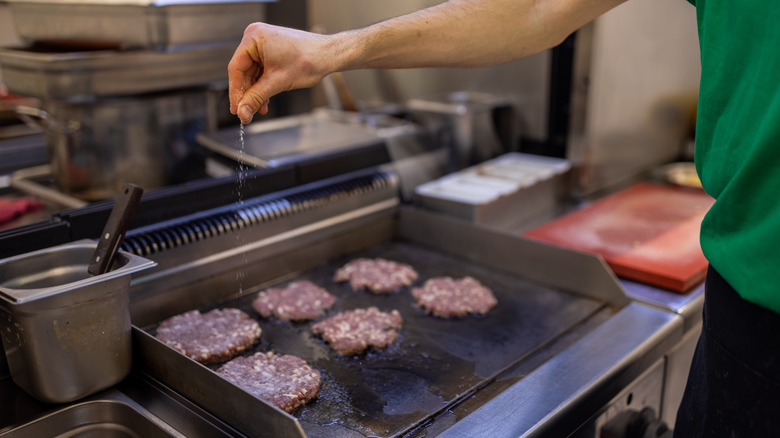
Salt is a flavor enhancer that you won't want to skip when grilling burgers. However, one of the most essential tips for grilling perfect burgers is to add salt when you're just about ready to put the patties on the grill. Adding salt too early can lead to disastrous results and unhappy barbecue guests.
NaCl, or salt, works to break down and dissolve proteins. If it sits on the meat for hours before the patties are cooked, the proteins in it will start to break down. This will cause the ground beef to become more compact. The finished burgers will have a very unpleasant rubbery texture, resembling that of rubber. So, the next time you plan to grill burgers, do yourself (and your guests a favor). Only add a sprinkle of salt to the outside of your patties just before placing them on the hot grill.
16. Serve condiments in muffin pans
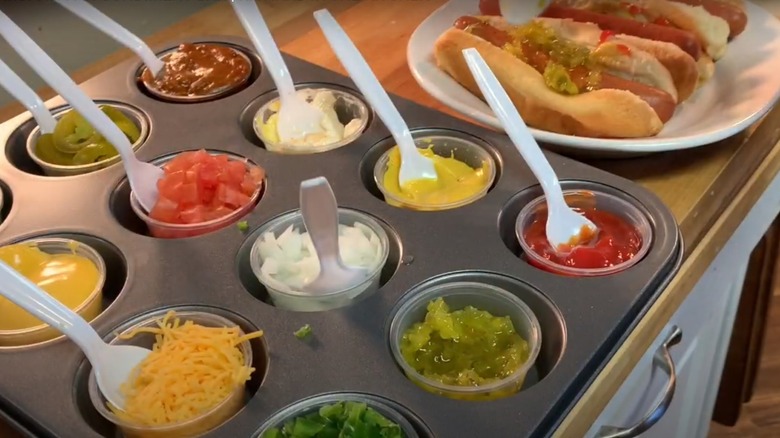
Ketchup. Mustard. Mayo. Barbecue sauce. Relish. The list of condiments goes on and on. If you want to be the host with the most for your backyard barbecue, you'll want to have plenty of condiments available so that your guests can build their burgers or hot dogs to their liking. However, with so many options, your tables can easily get filled up with all the different bottles and jars. Plus, if you're hosting a large gathering, you don't want to spend money purchasing multiple bottles of each condiment to have enough for each table.
Enter the beauty of using a muffin pan to hold your condiments. Fill each muffin cup with one type of condiment and place a spoon in it to allow guests to easily transfer it to their burger or frank. With muffin tins, you don't have to worry about all the loose bottles outside. Plus, you can easily use the same bottles or jars to fill the cups in multiple tins to accommodate several tables of guests. There are also 6-cup muffin tins available if you're not going to go crazy and offer every possible condiment under the sun.